SpringBoot源码分析,持续更新
0x00 SpringBootApplication注解
1 |
|
我们先从@SpringBootApplication入手
1 | (ElementType.TYPE) |
可以看到,@SpringBootApplication注解是一个组合注解,主要由@SpringBootConfiguration,@EnableAutoConfiguration和@ComponentScan这三个注解组合而成。
因此@SpringBootApplication注解主要作为一个配置类,能够触发包扫描和自动配置的逻辑,从而使得SpringBoot的相关bean被注册进Spring容器。
TODO 关于@EnableAutoConfiguration篇幅特别长这儿并不会直接调用,调用处涉及到后面会遇到的PostProcessor,下次有空再写
0x01 SpringApplication的构造方法(核心:SPI机制)
我们进入demo中的run方法
1 | // run方法是一个静态方法,用于启动SpringBoot |
我们先看构造方法中做了哪些事情,
1 | //构造方法就是给的成员变量赋值 |
1.1 推断应用类型
我们先看一下第3步推断应用类型
1 | public enum WebApplicationType { |
如上代码,根据classpath判断应用类型,即通过反射加载classpath判断指定的标志类存在与否来分别判断是Reactive应用,Servlet类型的web应用还是普通的应用。
1.2 获取主类
我们先跳过4和5步涉及到本章核心的SPI,直接看第6步
1 | private Class<?> deduceMainApplicationClass() { |
从调用栈数组中获取哪个类调用了main方法,然后再返回赋值给mainApplicationClass属性,然后用于后面启动流程中打印一些日志。
1.3 SPI机制
后面接着看核心的4步和5步,先说一下SpringBoot的SPI机制
SpringBoot利用自定义实现的SPI机制可以加载初始化器实现类,监听器实现类和自动配置类等等。如果我们要添加自动配置类或自定义监听器,那么我们很重要的一步就是在spring.factories中进行配置,然后才会被SpringBoot加载。
从第四步的 getSpringFactoriesInstances(ApplicationContextInitializer.class) 方法入手,看看getSpringFactoriesInstances方法中SpringBoot是如何实现自己的一套SPI来加载ApplicationContextInitializer初始化器接口的扩展实现类的?1
2
3
4
5
6
7
8
9
10
11
12
13
14//重载的getSpringFactoriesInstances方法
private <T> Collection<T> getSpringFactoriesInstances(Class<T> type, Class<?>[] parameterTypes, Object... args) {
//1、获得类加载器
ClassLoader classLoader = getClassLoader();
// Use names and ensure unique to protect against duplicates
//2、将接口类型和类加载器作为参数传入loadFactoryNames方法,从spring.factories配置文件中进行加载接口实现类
Set<String> names = new LinkedHashSet<>(SpringFactoriesLoader.loadFactoryNames(type, classLoader));
//3、实例化从spring.factories中加载的接口实现类
List<T> instances = createSpringFactoriesInstances(type, parameterTypes, classLoader, args, names);
//排序
AnnotationAwareOrderComparator.sort(instances);
//返回实例化好的接口实现类
return instances;
}
可以看到,SpringBoot自定义实现的SPI机制代码中最重要的是上面代码的【1】,【2】,【3】步,这3步下面分别进行重点分析。
1.3.1 获得类加载器
Java的SPI机制默认是利用线程上下文类加载器去加载扩展类的,那么,SpringBoot自己实现的SPI机制又是利用哪种类加载器去加载spring.factories配置文件中的扩展实现类呢?1
2
3
4
5
6
7
8
9
10
11
12
13
14
15
16
17
18
19
20
21
22
23
24
25
26
27
28
29
30
31
32
33
34
35
36
37// 先看第1步
public ClassLoader getClassLoader() {
// 前面在构造SpringApplicaiton对象时,传入的resourceLoader参数是null,因此不会执行if里面的逻辑
if (this.resourceLoader != null) {
return this.resourceLoader.getClassLoader();
}
// 获取默认的类加载器
return ClassUtils.getDefaultClassLoader();
}
```
继续跟进`getDefaultClassLoader`方法:
```java
public static ClassLoader getDefaultClassLoader() {
ClassLoader cl = null;
try {
// 【重点】获取线程上下文类加载器
cl = Thread.currentThread().getContextClassLoader();
}
catch (Throwable ex) {
// Cannot access thread context ClassLoader - falling back...
}
if (cl == null) {
// No thread context class loader -> use class loader of this class.
cl = ClassUtils.class.getClassLoader();
if (cl == null) {
// getClassLoader() returning null indicates the bootstrap ClassLoader
try {
cl = ClassLoader.getSystemClassLoader();
}
catch (Throwable ex) {
// Cannot access system ClassLoader - oh well, maybe the caller can live with null...
}
}
}
return cl;
}
可以看到,原来SpringBoot的SPI机制中也是用线程上下文类加载器去加载spring.factories文件中的扩展实现类的!
1.3.2 加载spring.factories配置文件中的SPI扩展类
我们接着看第二步的SpringFactoriesLoader.loadFactoryNames(type, classLoader)这句话,1
2
3
4
5
6
7public static List<String> loadFactoryNames(Class<?> factoryType, @Nullable ClassLoader classLoader) {
//构造方法中传进来的ApplicationContextInitializer.class
String factoryTypeName = factoryType.getName();
// 【重点】继续调用loadSpringFactories方法加载SPI扩展类
//然后通过map的getOrDefault只得到key是ApplicationContextInitializer相关类的集合
return loadSpringFactories(classLoader).getOrDefault(factoryTypeName, Collections.emptyList());
}
接着进入loadSpringFactories(classLoader)1
2
3
4
5
6
7
8
9
10
11
12
13
14
15
16
17
18
19
20
21
22
23
24
25
26
27
28
29
30
31
32
33
34
35
36
37
38
39
40
41
42
43
44
45
46
47
48
49
50
51
52
53
54
55
56
57
58
59
60
61
62
63
64
65
66
67
68private static Map<String, List<String>> loadSpringFactories( ClassLoader classLoader) {
//这儿是一个缓存map,如果之前获取过直接从缓冲中获取并返回
MultiValueMap<String, String> result = cache.get(classLoader);
if (result != null) {
return result;
}
// 若缓存中无记录,则去spring.factories配置文件中获取
try {
// 这里加载所有jar包中包含"MATF-INF/spring.factories"文件的url路径
Enumeration<URL> urls = (classLoader != null ?
classLoader.getResources(FACTORIES_RESOURCE_LOCATION) :
ClassLoader.getSystemResources(FACTORIES_RESOURCE_LOCATION));
result = new LinkedMultiValueMap<>();
// 遍历urls路径,将所有spring.factories文件的键值对 key:SPI接口类名 value:SPI扩展类名
// 加载放到 result集合中
while (urls.hasMoreElements()) {
URL url = urls.nextElement();
UrlResource resource = new UrlResource(url);
Properties properties = PropertiesLoaderUtils.loadProperties(resource);
for (Map.Entry<?, ?> entry : properties.entrySet()) {
String factoryTypeName = ((String) entry.getKey()).trim();
for (String factoryImplementationName : StringUtils.commaDelimitedListToStringArray((String) entry.getValue())) {
//// SPI接口名作为key,SPI扩展类作为value放入result中
result.add(factoryTypeName, factoryImplementationName.trim());
}
}
}
//放进cache中,防止后面重复读取文件
cache.put(classLoader, result);
return result;
}
catch (IOException ex) {
throw new IllegalArgumentException("Unable to load factories from location [" +
FACTORIES_RESOURCE_LOCATION + "]", ex);
}
}
```
`loadSpringFactories`方法主要做的事情就是利用之前获取的线程上下文类加载器将classpath中的所有spring.factories配置文件中所有SPI接口的所有扩展实现类给加载出来,然后放入缓存中。(这里是一次性加载放进缓存中,后续获取其他扩展类就不需要重复读取文件了)
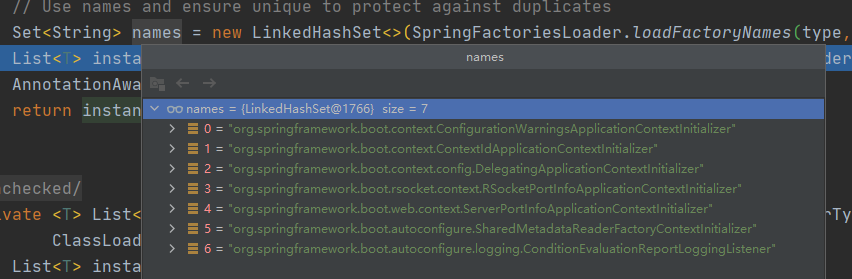
将所有的SPI扩展实现类加载出来后,此时再调用`getOrDefault(factoryClassName, Collections.emptyList())`方法根据SPI接口名去筛选当前对应的扩展实现类,比如这里传入的factoryClassName参数名为`ApplicationContextInitializer`接口,那么这个接口将会作为key从刚才缓存数据中取出`ApplicationContextInitializer`接口对应的SPI扩展实现类。其中从spring.factories中获取的ApplicationContextInitializer接口对应的所有SPI扩展实现类如下图所示:
### 1.3.3 实例化spring.factories中加载的SPI扩展类
前面从`spring.factories`中获取到`ApplicationContextInitializer`接口对应的所有SPI扩展实现类后,此时会将这些SPI扩展类进行实例化。
现在来看`第3步`实例化的代码`List<T> instances = createSpringFactoriesInstances(type, parameterTypes, classLoader, args, names);`
```java
private <T> List<T> createSpringFactoriesInstances(Class<T> type, Class<?>[] parameterTypes,
ClassLoader classLoader, Object[] args, Set<String> names) {
//新建集合用于保存后续实例化的类
List<T> instances = new ArrayList<>(names.size());
for (String name : names) {
try {
// 根据全限定名利用反射加载类
Class<?> instanceClass = ClassUtils.forName(name, classLoader);
// 断言刚才加载的SPI扩展类是否属于SPI接口类型
Assert.isAssignable(type, instanceClass);
Constructor<?> constructor = instanceClass.getDeclaredConstructor(parameterTypes);
//通过构造器实例化类
T instance = (T) BeanUtils.instantiateClass(constructor, args);
//放进集合
instances.add(instance);
}
catch (Throwable ex) {
throw new IllegalArgumentException("Cannot instantiate " + type + " : " + name, ex);
}
}
return instances;
}
这块代码很简单,就是把加载出来的SPI类实例化之后返回。
1.3.4 加载listener
同理第3步的步骤,通过传入ApplicationListener.class然后在刚才已经加载过的缓存中获取到key为ApplicationListener的SPI扩展类并实例化返回,最后赋值给SpringApplication的成员变量
1.4 总结
SpringApplication对象的构造过程其实就是给SpringApplication类的6个成员变量赋值;SpringBoot通过以下步骤实现自己的SPI机制:
- 首先获取线程上下文类加载器;
- 然后利用上下文类加载器从spring.factories配置文件中加载所有的SPI扩展实现类并放入缓存中;
- 根据SPI接口从缓存中取出相应的SPI扩展实现类;
- 实例化从缓存中取出的SPI扩展实现类并返回。
0x02 SpringApplication的run方法【一】
2.1 SpringBoot生命周期事件
2.1.1 run方法中的生命周期
1 | // SpringApplication.java |
可以看到业务逻辑跟上一章讲的一样,都是去spring.factories中加载SpringApplicationRunListener的SPI实现类,我们通过spring.factories中或者debug代码可以发现【0】处代码对象中的listeners对象只会返回一个EventPublishingRunListener,其在SpringBoot启动过程的不同阶段发射不同的SpringBoot的生命周期事件, 即SpringApplicationRunListeners对象没有承担广播事件的职责,而最终是委托EventPublishingRunListener来广播事件的。
因为从spring.factories中加载EventPublishingRunListener类后还会实例化该类,那么我们再跟进EventPublishingRunListener的源码,看看其是如何承担发射SpringBoot生命周期事件这一职责的?1
2
3
4
5
6
7
8
9
10
11
12
13
14
15
16
17
18
19
20
21
22
23
24
25
26
27
28
29
30
31
32
33
34
35
36
37
38
39
40
41
42
43
44
45
46
47
48
49
50
51
52
53
54
55
56
57
58
59
60
61
62
63
64
65
66
67
68
69
70
71
72
73
74
75
76
77
78
79
80
81
82
83
84
85
86
87
88
89
90
91
92
93
94
95
96
97
98
99// EventPublishingRunListener.java
public class EventPublishingRunListener implements SpringApplicationRunListener, Ordered {
private final SpringApplication application;
private final String[] args;
/**
* 拥有一个SimpleApplicationEventMulticaster事件广播器来广播事件
*/
private final SimpleApplicationEventMulticaster initialMulticaster;
public EventPublishingRunListener(SpringApplication application, String[] args) {
this.application = application;
this.args = args;
// 新建一个事件广播器SimpleApplicationEventMulticaster对象
this.initialMulticaster = new SimpleApplicationEventMulticaster();
// !!!!!!!重要!!!!!!!
// 遍历在构造SpringApplication对象时从spring.factories配置文件中获取的事件监听器
for (ApplicationListener<?> listener : application.getListeners()) {
// 将从spring.factories配置文件中获取的事件监听器们添加到事件广播器initialMulticaster对象的相关集合中
this.initialMulticaster.addApplicationListener(listener);
}
}
public int getOrder() {
return 0;
}
// 发送【ApplicationStartingEvent】事件
public void starting() {
this.initialMulticaster.multicastEvent(
new ApplicationStartingEvent(this.application, this.args));
}
// 发送【ApplicationEnvironmentPreparedEvent】事件
public void environmentPrepared(ConfigurableEnvironment environment) {
this.initialMulticaster.multicastEvent(new ApplicationEnvironmentPreparedEvent(
this.application, this.args, environment));
}
// 发送【ApplicationContextInitializedEvent】事件
public void contextPrepared(ConfigurableApplicationContext context) {
this.initialMulticaster.multicastEvent(new ApplicationContextInitializedEvent(
this.application, this.args, context));
}
// 发送【ApplicationPreparedEvent】事件
public void contextLoaded(ConfigurableApplicationContext context) {
for (ApplicationListener<?> listener : this.application.getListeners()) {
if (listener instanceof ApplicationContextAware) {
((ApplicationContextAware) listener).setApplicationContext(context);
}
context.addApplicationListener(listener);
}
this.initialMulticaster.multicastEvent(
new ApplicationPreparedEvent(this.application, this.args, context));
}
// 发送【ApplicationStartedEvent】事件
public void started(ConfigurableApplicationContext context) {
context.publishEvent(
new ApplicationStartedEvent(this.application, this.args, context));
}
// 发送【ApplicationReadyEvent】事件
public void running(ConfigurableApplicationContext context) {
context.publishEvent(
new ApplicationReadyEvent(this.application, this.args, context));
}
// 发送【ApplicationFailedEvent】事件
public void failed(ConfigurableApplicationContext context, Throwable exception) {
ApplicationFailedEvent event = new ApplicationFailedEvent(this.application,
this.args, context, exception);
if (context != null && context.isActive()) {
// Listeners have been registered to the application context so we should
// use it at this point if we can
context.publishEvent(event);
}
else {
// An inactive context may not have a multicaster so we use our multicaster to
// call all of the context's listeners instead
if (context instanceof AbstractApplicationContext) {
for (ApplicationListener<?> listener : ((AbstractApplicationContext) context)
.getApplicationListeners()) {
this.initialMulticaster.addApplicationListener(listener);
}
}
this.initialMulticaster.setErrorHandler(new LoggingErrorHandler());
this.initialMulticaster.multicastEvent(event);
}
}
//...
// 省略非关键代码
}
可以看到EventPublishingRunListener类实现了SpringApplicationRunListener接口,SpringApplicationRunListener接口定义了SpringBoot启动时发射生命周期事件的接口方法,而EventPublishingRunListener类正是通过实现SpringApplicationRunListener接口的starting,environmentPrepared和contextPrepared等方法来广播SpringBoot不同的生命周期事件,我们直接看下SpringApplicationRunListener接口的源码:1
2
3
4
5
6
7
8
9
10
11
12
13
14
15
16
17// SpringApplicationRunListener.java
public interface SpringApplicationRunListener {
void starting();
void environmentPrepared(ConfigurableEnvironment environment);
void contextPrepared(ConfigurableApplicationContext context);
void contextLoaded(ConfigurableApplicationContext context);
void started(ConfigurableApplicationContext context);
void running(ConfigurableApplicationContext context);
void failed(ConfigurableApplicationContext context, Throwable exception);
}
我们再接着分析EventPublishingRunListener这个类,可以看到其有一个重要的成员属性initialMulticaster,该成员属性是SimpleApplicationEventMulticaster类对象,该类正是承担了广播SpringBoot启动时生命周期事件的职责,即EventPublishingRunListener对象没有承担广播事件的职责,而最终是委托SimpleApplicationEventMulticaster这个类来广播事件的。 从EventPublishingRunListener的源码中也可以看到在starting,environmentPrepared和contextPrepared等方法中也正是通过调用SimpleApplicationEventMulticaster类对象的multicastEvent方法来广播事件的。
前面讲到从spring.factories中加载出EventPublishingRunListener类后会实例化,而实例化必然会通过EventPublishingRunListener的构造函数来进行实例化,因此我们接下来分析下EventPublishingRunListener的构造函数源码:1
2
3
4
5
6
7
8
9
10
11
12
13// EventPublishingRunListener.java
public EventPublishingRunListener(SpringApplication application, String[] args) {
this.application = application;
this.args = args;
// 新建一个事件广播器SimpleApplicationEventMulticaster对象
this.initialMulticaster = new SimpleApplicationEventMulticaster();
// 遍历在构造SpringApplication对象时从spring.factories配置文件中获取的事件监听器
for (ApplicationListener<?> listener : application.getListeners()) {
// 将从spring.factories配置文件中获取的事件监听器们添加到事件广播器initialMulticaster对象的相关集合中
this.initialMulticaster.addApplicationListener(listener);
}
}
可以看到在EventPublishingRunListener的构造函数中有一个for循环会遍历之前从spring.factories中加载的监听器们,然后添加到集合中缓存起来,用于以后广播各种事件时直接从这个集合中取出来即可,而不用再去spring.factories中加载,提高效率。
2.1.3 广播SpringBoot的内置生命周期事件
可以在之前的run方法中看到,SpringBoot的启动过程中总共会发射7种不同类型的生命周期事件,来标志SpringBoot的不同启动阶段,同时,这些生命周期事件的监听器们也会执行一些启动过程中的初始化逻辑,关于这些监听器的初始化逻辑将在下一篇内容中会分析。以下是SpringBoot启动过程中要发送的事件类型,其中ApplicationFailedEvent在SpringBoot启动过程中遇到异常才会发送:
- ApplicationStartingEvent
启动事件 - ApplicationEnvironmentPreparedEvent
环境已经准备好事件 - ApplicationContextInitializedEvent
初始化bean定义加载前事件 - ApplicationPreparedEvent
容器刷新refresh前事件 - ApplicationStartedEvent
容器刷新后事件 - ApplicationFailedEvent
容器启动失败事件 - ApplicationReadyEvent
启动成功的事件
我们以listeners.starting();这句代码为例,看看EventPublishingRunListener对象发送事件的源码:1
2
3
4
5
6
7
8
9// SpringApplicationRunListeners.java
public void starting() {
// 遍历listeners集合,这里实质取出的就是刚才从spring.factories中取出的SPI实现类EventPublishingRunListener
// 而EventPublishingRunListener对象承担了SpringBoot启动过程中负责广播不同的生命周期事件
for (SpringApplicationRunListener listener : this.listeners) {
// 调用EventPublishingRunListener的starting方法来广播ApplicationStartingEvent事件
listener.starting();
}
}
继续跟进listener.starting();的源码;1
2
3
4
5
6
7
8
9EventPublishingRunListener.java
// 发送【ApplicationStartingEvent】事件
public void starting() {
// EventPublishingRunListener对象将发布ApplicationStartingEvent这件事情委托给了initialMulticaster对象
// 调用initialMulticaster的multicastEvent方法来发射ApplicationStartingEvent事件
this.initialMulticaster.multicastEvent(
new ApplicationStartingEvent(this.application, this.args));
}
可以看到,EventPublishingRunListener对象将发布ApplicationStartingEvent这件事情委托给了SimpleApplicationEventMulticaster对象initialMulticaster,
,而initialMulticaster对象最终会调用其multicastEvent方法来发射ApplicationStartingEvent事件。
关于SimpleApplicationEventMulticaster类如何广播事件是属于Spring事件部分的源码,在这儿简述总结一下
事件:Event接口 -> AbstractContextEvent抽象类 -> 各种xx事件Event子类
监听器: listener接口有一个void onApplicationEvent(T event);方法,对应不同事件的Listener实现该方法,通过instanceof判断AbstractContextEvent是否对应自己的event做对应的事情。
广播: ApplicationEventMulticaster接口 -> SimpleApplicationEventMulticaster子类中维护listener的list将所有listener放到这里面,调用multicastEvent调用所有listener的onApplicationEvent(对应的event)方法,所有listener都会执行,instanceOf对应自己的的event才会执行,其他都直接if不满足条件退出;
这儿看一下广播的核心方法源码1
2
3
4
5
6
7
8
9
10
11
12
13
14
15
16
17
18
19
20
21
22
23
24
25
26
27
28
29
30
31
32
33
34
35
36
37
38
39
40
41
42
43
44
45
46
47
48
49
50
51
52
53
54
public void multicastEvent(final ApplicationEvent event, @Nullable ResolvableType eventType) {
ResolvableType type = (eventType != null ? eventType : resolveDefaultEventType(event));
// 获取执行异步任务的线程池,这里异步要外部指定一个线程池,注入进来
Executor executor = getTaskExecutor();
// 遍历每一个spring事件监听器
for (ApplicationListener<?> listener : getApplicationListeners(event, type)) {
// 若外部指定的线程池不为null,则异步广播事件
if (executor != null) {
executor.execute(() -> invokeListener(listener, event));
}
// executor为空,则单线程同步广播事件
else {
invokeListener(listener, event);
}
}
}
protected void invokeListener(ApplicationListener<?> listener, ApplicationEvent event) {
ErrorHandler errorHandler = getErrorHandler();
if (errorHandler != null) {
try {
// 这里真正执行广播事件的逻辑
doInvokeListener(listener, event);
}
catch (Throwable err) {
errorHandler.handleError(err);
}
}
else {
doInvokeListener(listener, event);
}
}
private void doInvokeListener(ApplicationListener listener, ApplicationEvent event) {
try {
// 回调监听器onApplicationEvent方法,执行监听逻辑
listener.onApplicationEvent(event);
}
catch (ClassCastException ex) {
String msg = ex.getMessage();
if (msg == null || matchesClassCastMessage(msg, event.getClass())) {
// Possibly a lambda-defined listener which we could not resolve the generic event type for
// -> let's suppress the exception and just log a debug message.
Log logger = LogFactory.getLog(getClass());
if (logger.isTraceEnabled()) {
logger.trace("Non-matching event type for listener: " + listener, ex);
}
}
else {
throw ex;
}
}
}